


 Juego Simón para 16f84
/******************* SIMON *********************
                  *                                             *
                  *                  By Yors                    *
                  *                 S.I.T.T.M                   *
                  *                                             *
                  ***********************************************/

/******************************** ESPECIFICACIONES *****************************

 El dispositivo físico consta de cuatro leds (rojo,verde,amarillo y azul)
 conectados a RA0,RA1,RA2 y RA3 (en ese orden),de un altavoz conectado a RB3
 y de cinco pulsadores.
 Un pulsador está conectado a RB0 (para generar el color aleatorio) y los otros
 cuatro,que corresponden a cada uno de los leds,están conectados a RB4,RB5,RB6
 y RB7.Tanto los leds como los pulsadores son activos a nivel alto.

*******************************************************************************/

/*******************
*   PREPROCESADO   *
********************/

#include <16F84.h>
#use delay(clock=4000000)
#use fast_io(A)
#use fast_io(B)
#fuses XT,NOWDT,NOPUT

/****************************************
*  DEFINICIÓN DE ETIQUETAS Y VARIABLES  *
*****************************************/

#byte   PORTA = 0x05      // Puerto A

#byte   PORTB = 0x06      // Puerto B y bits utilizados
#bit  RB0 = 0x06.0
#bit  RB3 = 0x06.3
#bit  RB4 = 0x06.4
#bit  RB5 = 0x06.5
#bit  RB6 = 0x06.6
#bit  RB7 = 0x06.7

#byte   INTCON = 0x0B

int aleatorio,dir_lectura,dir_escritura,color_leido,leido,color_pulsado,nivel;
short fin_juego;

/***************
*  SUBRUTINAS  *
****************/

void retardo(int latencia)
   {
   switch(latencia)
      {
      case 1: delay_ms(200);       // Correspondiente al nivel 1
      break;
      case 2: delay_ms(100);       // Nivel 2
      break;
      case 3: delay_ms(50);       // Nivel 3
      break;
      case 4: delay_ms(15);       // Nivel 4
      break;
      default:
      break;
      }
   }

void altavoz(int tono)  // Para generar un sonido diferente para cada color
   {
   int i,j;
   for(i=0; i<=40; i++)
     {
     for(j=0; j<=4; j++)
       {
       output_high(PIN_B3);      // La distancia entre pulso y pulso viene determinada
       delay_us(300*(6-tono));   //  por el parámetro tono
       output_low(PIN_B3);
       delay_us(300*(6-tono));
       }
     }
   }

void antirebote()
   {
   delay_ms(30);
   while(PORTB != 0) {}  // No progresamos hasta que ningún pulsador esté activo
   delay_ms(30);
   }

void comprueba()
   {
   leido = read_eeprom(dir_lectura);  // Leemos la dirección eeprom correspondiente.
   if(leido != color_pulsado)         // Si la pulsación no ha sido correcta,acaba el
    {                                 //  juego y volvemos al principio del programa
    fin_juego = true;
    }
   }

void enciende_led(int color)  // Enciende el led correspondiente
   {
   switch(color)
      {
      case 1: output_high(PIN_A0);     // Led rojo
      break;
      case 2: output_high(PIN_A1);     // Led verde
      break;
      case 3: output_high(PIN_A2);     // Led amarillo
      break;
      case 4: output_high(PIN_A3);     // Led azul
      break;
      default: PORTA = 15;             // Los 4 leds
      break;
      }
   }

void escoge_nivel()    // El led que se mantiene encendido corresponde al nivel elegido
   {
   nivel = 1;
   PORTA = 0;
   output_high(PIN_A0);  // Por defecto,encendemos el led rojo (nivel 1).
   while(!RB0)              // El nivel por defecto es el 1.Hasta que pulsemos RB0
      {                     //  podremos seleccionar cualquiera de los 4 niveles
      if(RB4)
       {
       nivel = 1;
       PORTA = 0;
       output_high(PIN_A0);      // Nivel 1 - > led rojo encendido
       antirebote();
       }else if(RB5) {
        nivel = 2;
        PORTA = 0;
        output_high(PIN_A1);     // Nivel 2 - > led verde encendido
        antirebote();
       }else if(RB6) {
        nivel = 3;
        PORTA = 0;
        output_high(PIN_A2);     // Nivel 3 - > led amarillo encendido
        antirebote();
       }else if(RB7) {
        nivel = 4;
        PORTA = 0;
        output_high(PIN_A3);     // Nivel 4 - > led azul encendido
        antirebote();
       }
      }
   antirebote();
   PORTA = 15;            // Una vez hemos escogido nivel,se encienden los 4 leds
   delay_ms(1000);        //  para indicar que podemos empezar a jugar
   PORTA = 0;
   }

void genera_aleatorio()   // Al pulsar RB0 genera un número entre 1 y 4 que se guardará
   {                      // tal cual en memoria...
   aleatorio = 1;               // 1 -> Rojo
   while(!RB0)                  // 2 -> Verde
     {                          // 3 -> Amarillo
     if(aleatorio == 4)         // 4 -> Azul
       {
       aleatorio = 1;
       }else {
       aleatorio++;
       }
     }
   antirebote();
   }

void guarda_color()
   {
   write_eeprom(dir_escritura,aleatorio);  // Guardamos el color generado y apuntamos a
   dir_escritura++;                        //  la siguiente dirección para una próxima
   }                                       //  escritura

void has_fallado(int tono)     // Si entramos aquí es que hemos pulsado incorrectamente
   {
   int i,j;
   enciende_led(color_pulsado);
   for(i=0; i<=100; i++)          // Generamos tono de error (más grave)
     {
     for(j=0; j<=4; j++)
       {
       output_high(PIN_B3);
       delay_ms(1*(6-tono));
       output_low(PIN_B3);
       delay_ms(1*(6-tono));
       }
     }
   delay_ms(1000);
   }

void muestra_colores()
   {
// Desde el primero hasta el último que se ha guardado en memoria,los vamos mostrando
//  con una rapidez que vendrá determinada por el nivel de dificultad elegido al principio.
   for(dir_lectura = 0; dir_lectura < dir_escritura; dir_lectura++)
      {
      color_leido = read_eeprom(dir_lectura);   // Lectura eeprom
      enciende_led(color_leido);                // Enciende led correspondiente
      altavoz(color_leido);                     // Emite tono
      retardo(nivel);                           // Retardo según nivel de dificultad
      PORTA = 0;                                // Apaga led
      retardo(nivel);                           // Retardo según nivel de dificultad
      }
   }

void pulsa_secuencia()
   {
   short sal;
   dir_lectura = 0;
// Recogemos las pulsaciones y se va comprobando si son correctas hasta que
//  alguna no lo sea o hasta que hayamos acertado todos los colores guardados
//  hasta el momento.
// dir_escritura contiene la dirección eeprom siguiente al último color guardado
//  y dir_lectura la usamos para ir consultando cada posición de memoria y comprobar
//  si la pulsación ha sido correcta.En el momento en que fallemos alguna,fin_juego toma
//  el valor TRUE.
   while((dir_lectura < dir_escritura) && (!fin_juego))
      {
      sal = false;
      while(!sal)  // Mientras no haya pulsación nos mantenemos dentro del bucle
         {
         if(input(PIN_B4))             // Se ha pulsado el rojo,salimos del bucle
          {
          color_pulsado = 1;
          sal = true;
          }else if(input(PIN_B5)) {    // Se ha pulsado el verde,salimos del bucle
          color_pulsado = 2;
          sal = true;
          }else if(input(PIN_B6)) {    // Se ha pulsado el amarillo,salimos del bucle
          color_pulsado = 3;
          sal = true;
          }else if(input(PIN_B7)) {    // Se ha pulsado el azul,salimos del bucle
          color_pulsado = 4;
          sal = true;
          }else {                      // No se ha pulsado ninguno,continuamos
          sal = false;                 //  dentro del bucle
          }
         }
      comprueba();   // Algoritmo que comprueba si la pulsación ha sido correcta
      enciende_led(color_pulsado);  // Enciende el led del color que hemos pulsado
      altavoz(color_pulsado);       // Genera el tono del color que hemos pulsado
      antirebote();                 // No comment
      PORTA = 0;                    // Apagamos led
      dir_lectura++;                // Para comprobar la siguiente dirección eeprom
      }
   }

/*********************
* PROGRAMA PRINCIPAL *
**********************/

void main()
   {
// Inicialización periféricos
   set_tris_B(0b11110001);    // RB0,RB4,RB5,RB6 y RB7 entradas --- RB1,RB2 Y RB3 salidas
   set_tris_A(0b00000000);    // Todo salidas
   output_low(PIN_B1);               // RB1 no la usamos
   output_low(PIN_B2);               // RB2 no la usamos
   output_low(PIN_B3);               // RB3 conectado al altavoz
   INTCON=0;
   enable_interrupts(INT_EEPROM); // Unica interrupción habilitada durante toda la ejecución
   enable_interrupts(GLOBAL);     // Habilitador general de interrupciones

// Bucle principal (Se ejecuta de forma indefinida)
   for(;
     {
     dir_escritura = dir_lectura = color_leido = leido = color_pulsado = 0;  // Inicializamos variables
     fin_juego = false;
     escoge_nivel();  // Para escoger entre 4 niveles de dificultad
     while(!fin_juego)
        {
        genera_aleatorio();      // Generamos color
        guarda_color();          // Guardamos color en memoria
        muestra_colores();       // Mostramos colores guardados hasta el momento
        pulsa_secuencia();       // Recogemos pulsaciones
        if(!fin_juego)        // Cada vez que acertamos una secuencia completa,encendemos
         {                    //  los 4 leds y generamos tres tonos musicales
         enciende_led(5);     //
         altavoz(1);          //
         altavoz(2);          //
         altavoz(4);          //
         PORTA = 0;           //
         }                    //
        }
     has_fallado(4);     // Si hemos salido del bucle anterior es porque hemos fallado,de
     }                   //  aquí volvemos al principio del bucle principal.
   }
Fuente: http://www.todopic.com.ar/foros/index.php?topic=2456.0;wap2
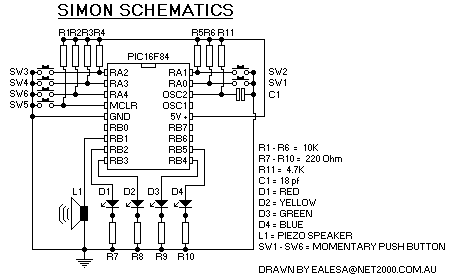
Circuito juego simon
Esto se basa en un antiguo juego de mano electrónico “Simon”. Interruptores de pulsador a 4, el usuario intenta reflejar una secuencia cada vez más difícil de LED parpadea y el altavoz de llamada. Tras la finalización con éxito de juego (de 63 jugadas), el juego suena una serie de tonos de la bicicleta. No a la entrada en cualquier punto en el juego, mover el correcto será mostrado, el tono de error sonará y, a continuación, pasar el máximo número alcanzado es sonaba en el altavoz: en primer lugar, bajo el sonido de los tonos “decenas” y, a continuación, una superior sonará el tono de “queridos”. Entonces, llegó el 12 se mueve, bajo un único tono de sonido seguido de dos tonos más altos.
Cada movimiento se almacena en la memoria y la compara con 4 interruptores de entrada del usuario. El “se mueve” generado por el programa se obtienen de la TMR0 registro en el momento de la última entrada del usuario, evitando que el usuario pueda empujar intencionalmente un interruptor en un momento determinado para generar un volumen de negocios previsible en LED.
Cada “movimiento” está grabado en la memoria EEPROM de datos, 1 de “mover” por registro de memoria (desde 0×00 lugar no se utiliza, que realmente sólo tienen 63 movimientos posible). Al desfase de un interruptor de entrada del usuario y una grabación (prevista) “mover” el LED se encenderá mientras que un timbre suena el tono de error. Además, si el usuario tiene más tiempo de lo permitido (~ 5 segundos), se indicará el tiempo de no coincidir. Tenga en cuenta que si el usuario espera 4,9 segundos para presionar el botón, entonces tiene otro 4 segundos para la liberación, como TMR_Overflow se restablece. Esto da un total de 10 segundos entre el tiempo para pensar si se mueve el usuario está realmente cuidado.
(Nota: Es posible instalar 4 “se mueve” por cada registro (en el pasado) para aumentar al máximo la capacidad de almacenamiento de 252 movimientos, pero en este momento, 63 movimientos son suficientes. Si alguien quiere intentar aumentar esta a 126 movimientos (de intercambio los movimientos en los registros de almacenamiento) o más (hasta 252 movimientos por el cambio de 2 LED bits), vaya a la derecha por delante. escribí el núcleo de la presente en un día, y ha añadido algunas opciones más tarde, por lo que probablemente cierto margen de mejora. Por otro lado, si usted puede recordar más de 63 movimientos en secuencia, probablemente no se debe jugar este juego:)
Tenga en cuenta el uso de interrupciones TMR0 para generar los diferentes tonos. Esto permite el control continuo asincrónico de cambiar la entrada de votación y el altavoz de oscilación. Traté de comentar el tan completamente como sea posible para ayudar a los nuevos PIC programación. Si hay algo que no entiendo, mándenme un e-mail y yo intentaré ayudar.
Opciones:
Un botón de reinicio (SW5) se ofrece para el usuario para reiniciar un nuevo juego (tira MCLR a Vss para restablecer). Este botón puede ser omitido en caso de On / Off está instalado.
Un conmutador (SW6) está prevista la elección de dificultad alta o baja (rápido o lento el juego).
Mantiene pulsado el botón rojo (SW1) durante el encendido iniciará un “modo de demostración,” donde el programa crea la secuencia de mover y lo muestra sin aceptar la entrada del usuario.
Mantiene pulsado el botón amarillo (SW2) durante el encendido iniciará un “modo de invertir”, donde la secuencia de movimientos se muestra en orden inverso (el más reciente aparece primero).
Mantiene pulsado el botón verde (SW3) durante el encendido iniciará un “modo silencioso”, donde los tonos no sonaba, junto con la iluminación LED.
Mantiene pulsado el botón azul (SW4) durante el encendido iniciará un “modo doble”, donde dos movimientos se generan en torno a cada vez (muy difícil).
Si alguien no construir uno de estos, me encantaría saberlo. Por favor, envíenme un e-mail a snurple@hotmail.com
Se incluye un muy buen esquema con las partes incluidas recomendado. Por el altavoz piezoeléctrico, lo que hice fue buscar un interior de un viejo módem de ordenador que tenía por ahí. Lo que se necesita es un zumbador piezoeléctrico impulsadas externamente. Especificado P9924-ND orador de Digi-Key (www.digi-key.com) funciona estupendamente, y es sólo ~ $ 2. También puede utilizar un 7 u 8 ohmios altavoz en miniatura de audio si está cuidado para limitar la corriente con una serie de resistencia de 100 ohms. Interruptores momentáneos que cualquier trabajo, pero los que han recomendado un mayor perfil de buen tamaño con un botón de superficie. Sólo construirlo en perfboard o, como yo, un proyecto con el cuadro incluido perfboard de Radio Shack por $ 4.00.
Para obtener los +5 V, puede usar 4 pilas AAA, si te gusta, o un par de pilas de litio 3V, 6V una “N” de tamaño de batería, o un pack de 4.8V NiCd recargable. O bien, puede hacer un circuito regulador de tensión mediante un regulador tipo 7805 o equivalente (como un LM2931) y el poder todo el circuito mediante una batería de 9V sentado en la parte inferior de la caja de Radio Shack proyecto. El circuito sólo llamadas a las líneas de suministro de +5 V. ¿Cómo llegar depende de usted.
Además, el esquema no muestra una de encendido / apagado de alimentación. He incluido una en la lista de materiales. Acaba de poner en la línea de +5 V a la Vdd alfiler. Si utiliza esto, no es necesario un Reajuste (SW5), pero usted puede dejar en uno para mayor comodidad.
Otra cosa para notar es que el 16F84 recomienda utilizar una ficha 50-100 ohm resistor en serie con la MCLR cuando se tiró al suelo. No he tenido ningún problema con tirar directamente al suelo, pero es probablemente mejor para estar seguro. Basta con conectar una resistencia de 100 ohms entre el interruptor y SW5 terreno.
En la medida en que el código se refiere, en particular la nota asíncrona orador oscilación de entrada y el botón de votación. Hay algunos ejemplos de multa código (así como algunos no tan grandes de código) en el programa. Además, los datos EEPROM recordar el código es bastante sólida, y el uso de los FSR es agradable registro. Si usted es un principiante, usted puede aprender algo de este programa. Si eres un experto, escriba su propio código, si no te gusta!
Lista de materiales (Digi-Key con el número de pieza y la cantidad):
PIC16F84 PIC16F84 PIC16F84-04/P-ND 1
SW6 de encendido / apagado y dificultad para cambiar SW101-ND 2
SW1-4 botones momentánea SW421-ND 4
SW5 momentánea botón de reinicio SW401-ND 1
L1 zumbador piezoeléctrico P9924-ND 1
D1 LED rojo 160-1045-ND 1
D2 LED verde 160-1049-ND 1
D3 LED amarillo 160-1053-ND 1
D4 LED Naranja 160-1109-ND 1
(Nota: Estos LEDs tienen por encima de resistencias ya entran en el LED de la vivienda.)
(Si desea utilizar otro tipo de LED, tendrá que utilizar los 220-820 ohmios)
(resistencia de la red se muestra en el esquema. Si utiliza la especificada arriba)
(LED, usted no necesita la resistencia de la red, solo conectar directamente a)
(ground. Además, me indicó un LED azul en el esquema y en el código ASM)
(pero el color naranja es una brillante y está disponible con el integrante resistencia.)
18pF capacitor BC1004CT-ND 1
Ascendentes 4.7K resistor 4.7KEBK-ND 1
10K resistencias 10KEBK-ND 2
Resistencia de 10K red 4606X-1-103-ND 1
————————————————– ————–
Costo total de piezas: menos de $ 10.00, sin incluir el proyecto PIC o caja
Codigo asm:
; Simon.asm program
; Written by Andrew D. Vassallo (snurple@hotmail.com)
; copyright 2000, 2001
;
; This code may not be used for any commercial purposes.  If reproduced in any form, the original
; author's credits must be included.  Users are free to distribute this code in any form, as long as
; it is done so free of charge.  Modifications are welcome, as long as the original author's credits
; remain intact in the header of this file.
;------------------------------------------------------------------------------------------------------
; Program Abstract
;
; This is based on an old handheld electronic game "Simon."  Through 4 pushbutton switches,
; the user attempts to mirror an increasingly difficult sequence of blinking LEDs and speaker
; tones.  Upon successful game completion (of 63 moves), the game sounds a cycling series of tones.
; Upon failed input at any point in the game, the correct move will be displayed, the error tone
; will sound, and then the maximum move number reached is sounded out on the speaker: first, low
; tones will sound the "tens" and then a higher tone will sound the "ones."  So, for 12 moves reached,
; one single low tone will sound followed by two higher tones.
;
; Each move is stored in memory and matched against 4 user input switches.
; The "moves" generated by the program are obtained from the TMR0 register at the time of
; the last user input, preventing the user from intentionally pushing a switch at a specific
; time to generate a predictable LED turn-on.
;
; Each "move" is recorded in EEPROM data memory, 1 "move" per memory register (since location 0x00 isn't
; used, we really only have 63 moves possible).  Upon
; mismatch of a switch input from the user and a recorded (expected) "move," the correct LED
; will turn on while a buzzer sounds the error tone.  Also, if the user takes more time
; than allowed (~5 seconds), the timeout will indicate failed match.  Note that if the user waits
; 4.9 seconds to press the button, then he has another 4 seconds to release it, as TMR_Overflow is
; reset.  This gives a total of 10 seconds time to think between moves if the user is really careful.
;
; (Note: It is possible to fit 4 "moves" per register (shifted in) to maximize the storage capacity at 252
; moves, but at this point, 63 moves are enough.  If anyone wants to try to increase this to 126 moves (swap
; the moves into the storage registers) or more (up to 252 moves by shifting the 2 LED bits), go right
; ahead.  I wrote the core of this in a day, and added some options later, so there's probably some room for
; improvement.  On the other hand, if you can remember more than 63 moves in sequence, you probably
; shouldn't be playing this game
;
; Note the use of TMR0 interrupts to generate the different tones.  This effectively allows continuous
; asynchronous control of switch input polling and speaker oscillation.
; I tried to comment this as completely as possible to help out those new to PIC programming.  If
; there's something you don't understand, drop me an e-mail and I'll try to help.
;
;------------------------------------------------------------------------------------------------------
; Options:
; A reset button (SW5) is provided for the user to restart a new game (pulls MCLR down to Vss for reset).
; This button may be omitted if a power On/Off switch is installed.
;
; A switch (SW6) is provided for choosing high or low difficulty (fast or slow game play).
;
; Holding down the Red button (SW1) during power-up will initiate a "demonstration mode," where the program
; creates the move sequence and displays it without accepting user input.
;
; Holding down the Yellow button (SW2) during power-up will initiate a "reverse mode," where the sequence
; of moves is displayed in reverse order (the latest move is displayed first).
;
; Holding down the Green button (SW3) during power-up will initiate a "silent mode," where the tones are
; not sounded along with the LED illumination.
;
; Holding down the Blue button (SW4) during power-up will initate a "double mode," where two moves are
; generated each time around.
;------------------------------------------------------------------------------------------------------
list      p=16F84             ; list directive to define processor
#include <p16F84.inc>         ; processor specific variable definitions

__CONFIG   _CP_OFF & _WDT_OFF & _PWRTE_ON & _RC_OSC

;------ All timing in this program is set for RC operation using a 4.7K and 18 pF RC circuit.  This really
;------ doesn't operate properly at the calculated frequency, so I had to change the timing for the delay
;------ loops and buzzer tones through experimentation.  Each Tcy is approximately 1.8us rather than 1.0us
;------ (at 4MHz).  If desired, a 4MHz crystal could be used with a TMR0 prescale of 1:2 and probably achieve
;------ the same overall game speed.  Maybe some of the Delay subroutine timing would have to be fixed, though,
;------ as it counts based on incrementing W, not via TMR0.

;***** VARIABLE DEFINITIONS
CBLOCK 0x0C
w_temp
status_temp ; for context saving during interrupt routines
rnd_hold ; register to hold temporary value of rnd number
TMR_Div ; divisor for TMR0 overflow - every 64 overflows equals ONE TMR_Overflow increment
TMR_Overflow ; counts how many times TMR0 overflows
Delay_Count ; counter for delay loop
LED_Number ; holds which LED should be active
User_Number ; holds which button was pressed by user
Move_Number ; register to hold address of EEPROM current move
Recall_Addr ; current move number - call address for EEPROM recall routine
speed_value ; holds the current tone delay cycle
Tone ; register to hold flags to determine which tone to sound:
; (if all clear, do not sound any tones)
; bit0: 1=sound Red_Tone
; 0=don't sound Red_Tone
; bit1: 1=sound Yellow_Tone
; 0=don't sound Yellow_Tone
; bit2: 1=sound Green_Tone
; 0=don't sound Green_Tone
; bit3: 1=sound Blue_Tone
; 0=don't sound Blue_Tone
; bit4: 1=sound Error_Tone
; 0=don't sound Error_Tone
Tone_Count ; register to hold the number of TMR0 overflows desired for proper tone
flags ; register to hold generic flags
; bit0: 1=tone output wave currently high
; 0=tone output wave currently low
; bit1: 1=demo mode enabled
; 0=demo mode off - normal program operation
; bit2: 1=reverse mode enabled - newest move displayed first
; 0=normal program operation - newest move displayed last
; bit3: 1=difficult mode - two moves per round
; 0=easy mode - normal operation
; bit4: 1=second time through loop for difficult mode
; 0=first time through loop - ok to repeat for second move in this round
; bit5: 1=silent mode enabled
; 0=not silent mode - OK to output tones
Hold_Number ; register to hold the random number seed for next randomized number (used for demo mode)
ENDC ; 15 RAM registers allocated

;------ Initialize literal values
Timeout EQU 0xC8 ; timeout delay limit (Timeout * TMR0 overflows*64 = ~5 seconds)
easy_speed EQU 0x14 ; starting speed value - 20 loops is a nice starting speed
; increasing this will slow the game play down by increasing the buzzer ON time, and vice versa
; Using this value, it will take 26 moves to get down to the base_speed.
difficult_speed EQU 0x0D ; using this value, it will take 12 moves to get to the base speed
base_speed EQU 0x07 ; upper limit for speed, be careful (0x07 is not very fast, but fast enough)
Error_Tone EQU 0x08 ; 8 loops @ 256*1.8us = 135 Hz
Red_Tone EQU 0x05 ; 5 loops @ 256*1.8us = 2.30ms per high and low bit (217Hz)
Yellow_Tone EQU 0x04 ; 4 loops @ 256*1.8us = 1.84ms per high and low bit (271Hz)
Green_Tone EQU 0x03 ; 3 loops @ 256*1.8us = 1.38ms per high and low bit (361Hz)
Blue_Tone EQU 0x02 ; 2 loops @ 256*1.8us = .920ms per high and low bit (542Hz)

OPTIONVAL EQU 0x98 ; PORTB P/U off, TMR0 internal, RB0 falling edge, WDT prescale (1:1 for TMR0)
INTCONVAL EQU 0xA8 ; GIE & T0IE enabled, RB0 int. disabled, RBIE (port change) enabled for Tone generation only
TRISAVAL EQU 0xFF ; direction: PORTA all input
;-- PORTA<0:3> are Red, Yellow, Green, Blue pushbuttons, respectively
TRISBVAL EQU 0x00 ; direction: PORTB all output
;-- RB1 is connected to speaker output.
;-- PORTB<2:5> are Red, Yellow, Green, Blue LEDs, respectively
;-- Note that RB0 is reserved in case RB0 interrupt is desired.

;**********************************************************************
ORG     0x000 ; processor reset vector
  goto    Start ; go to beginning of program

;------ Interrupts below
ORG     0x004 ; interrupt vector location

movwf w_temp ; save off W and STATUS registers
swapf STATUS, 0
movwf status_temp
clrf STATUS ; select Bank0
btfsc flags, 5 ; if silent mode...
clrf Tone ; ...then prevent any tones from sounding
btfsc INTCON, T0IF
goto Timer_Int
btfsc INTCON, RBIF ; PORTB change flag (only set to generate tone)
goto Generate_Tone
movf INTCON, 0
andlw 0xF8 ; clear all flags and ignore the interrupt if unknown
movwf INTCON
goto Reset_Interrupts

Timer_Int
;------ Note the use of TMR_Div - this achieves a dual rate for TMR0 overflow.  The straight 1:1 rate is used for
;------ the tone generation frequency count, and the 1:64 rate is used for the game speed.
bcf INTCON, T0IF ; clear TMR0 overflow-interrupt flag
decfsz TMR_Div
goto Continue_Tone ; always find out if a tone is sounding
incf TMR_Overflow ; this increments once every 64 TMR0 overflows
movlw 0x40 ; reset TMR_Div to 64 cycles through
movwf TMR_Div
goto Continue_Tone ; always check tone sound if TMR0 overflows

Generate_Tone
;------ Find out which Tone should be sounded, then begin the tone on the NEXT TMR0 interrupt
btfsc Tone, 0
movlw Red_Tone
btfsc Tone, 1
movlw Yellow_Tone
btfsc Tone, 2
movlw Green_Tone
btfsc Tone, 3
movlw Blue_Tone
btfsc Tone, 4
movlw Error_Tone
movwf Tone_Count
goto Reset_Interrupts
Continue_Tone
movf Tone, 1
btfss STATUS, Z ; if Tone register is all zeros, do not sound or continue any tones
decfsz Tone_Count
goto Reset_Interrupts
goto Switch_Wave
Switch_Wave
btfss flags, 0 ; if we're currently outputting a high wave, switch to low
goto Set_High
bcf PORTB, 1
bcf flags, 0 ; we're outputting a low wave now
goto Generate_Tone ; reset Tone_Count for next time
Set_High
bsf PORTB, 1 ; otherwise set the wave high
bsf flags, 0 ; we're outputting a high wave now
goto Generate_Tone

Reset_Interrupts
bcf INTCON, RBIF ; always keep this flag cleared
swapf status_temp, 0 ; restore all registers
movwf STATUS
swapf w_temp, 1
swapf w_temp, 0
retfie

;------ Done with interrupts.

Start
bsf STATUS, RP0 ; select bank 1
movlw OPTIONVAL
movwf OPTION_REG ; set options in PIC
movlw TRISAVAL
movwf TRISA ; set port A direction bits
movlw TRISBVAL ; set PORTB for all output
movwf TRISB
bcf STATUS, RP0 ; select bank 0

clrf Move_Number
clrf Tone
clrf flags
movlw 0x3C
movwf PORTB ; set all LEDs to turn on for power-up indication

btfss PORTA, 0 ; Red button normally pulled high - if low, then enable demo mode
bsf flags, 1
btfss PORTA, 1 ; Yellow button normally pulled high - if low, then enable reverse mode
bsf flags, 2
btfss PORTA, 2 ; Green button normally pulled high - if low, then enable silent mode
bsf flags, 5
btfss PORTA, 3 ; Blue button normally pulled high - if low, then enable double mode
bsf flags, 3

movlw base_speed ; base speed - absolute upper speed limit
movwf speed_value
movlw easy_speed ; default is easy speed
btfss PORTA, 4
movlw difficult_speed ; difficult switch selected (normally pulled high)
addwf speed_value ; add the constant to the base speed
;------ How speed_value works:
; LED will light and correct tone will sound *when generated by the program*.  (When user input generates the tone, it
; will shut off when the button is released, or if the timeout is exceeded)  A flag is set to initiate an interrupt
; to begin the tone sounding.  After TMR_Overflow increments enough to equal the speed_value, the sound will shut off.
; TMR_Overflow will increment once per (256 TMR0 counts * 64 TMR_Div) instructions @ ~1.8us each.  So, the total time for
; each TMR_Overflow is ~0.0295 seconds.  With a speed_value of 0x10, for example, this will be 16*.0295=0.47 seconds per
; move.  Note that this will keep getting faster until the base_speed is reached.
;------

;------ Delay for ~4 seconds (3 + 1 for Main delay) for user to get set up
clrw
clrf Delay_Count ; set for 256 loops (~.45 seconds total)
call Delay
clrw
clrf Delay_Count ; set for 256 loops
call Delay
clrw
clrf Delay_Count ; set for 256 loops
call Delay
clrw
clrf Delay_Count ; set for 256 loops
call Delay
clrw
clrf Delay_Count ; set for 256 loops
call Delay
clrw
clrf Delay_Count ; set for 256 loops
call Delay
clrw
clrf Delay_Count ; set for 256 loops
call Delay

movlw INTCONVAL
movwf INTCON ; set interrupts
movf TMR0, 0
movwf Hold_Number ; used for demo mode
clrf PORTB ; turn off all LEDs after power-up sequence

Main
;------ Delay for ~1 second between sequences
clrw
clrf Delay_Count ; set for 256 loops
call Delay
clrw
clrf Delay_Count ; set for 256 loops
call Delay

rrf Move_Number, 0 ; decrement once every 2 moves to increase game speed
btfss STATUS, C
goto No_Reduction

movf speed_value, 0
sublw base_speed
btfss STATUS, C ; if speed_value >= base speed, speed_value-- every 2 moves
decf speed_value

No_Reduction
;------ This section reads the current value of TMR0 (unpredictable because of user input on switches) and loads
;------ it into LED_Number to be randomized.  If demo mode is enabled, don't use TMR0 each time, only use the first
;------ one as a seed, then recycle each randomized value as a seed for the next move.
;------ Once the move is randomized, it's stored in EEPROM memory, then the recall address is set (to the first move
;------ if normal operation, or to the last move if reverse mode is enabled) and each move is recalled and displayed
;------ at a speed determined by the speed_value.
movf TMR0, 0 ; use unknown state of TMR0 as seed for random number
btfsc flags, 1 ; if demo mode, load random number
movf Hold_Number, 0
movwf LED_Number
call Randomize ; returns LED number to illuminate next
incf Move_Number ; create next move - do not use location 0x00 (start at 0x01)
call Store_Number ; add this number to stored values
clrf Recall_Addr
incf Recall_Addr ; begin at 0x01 for move recall for normal operation mode
movf Move_Number, 0
btfsc flags, 2 ; if reverse mode, begin recall address at maximum move number
movwf Recall_Addr ; start recalling moves at the current max. move number
; This register is decreased to zero to provide the move sequence
; while the Move_Number register holds the current latest move number
sublw 0x40
btfsc STATUS, Z ; 64 moves max. (really 63 since we started at 0x01)
goto Game_Finished ; if we get to this point, game is over

btfsc flags, 3 ; if we're in difficult mode, then check flag bit 4
btfsc flags, 4 ; if this is the first time through (bit=clear)...
goto Recall_Loop ; if bit3 clear or if bit4 set, skip the second move
bsf flags, 4
goto Main ; ...then set flag and create another move for difficult mode
Recall_Loop
bcf flags, 4 ; as default, clear flag
movlw 0xAA ; set for 170 loops to add a small break between moves
movwf Delay_Count
clrw
call Delay
call Recall_Number ; read the current Recall_Addr and return the move into LED_Number

movlw LED_Number ; treat as literal to load address pointer into FSR
movwf FSR ; load FSR with LED_Number address pointer
call Switch_LED ; determines which LED to illuminate, does so and selects tone
call SoundTone ; begin sounding correct tone

btfsc flags, 2 ; if reverse mode is set, skip to proper display method
goto Reverse_Method
movf Move_Number, 0
subwf Recall_Addr, 0
btfsc STATUS, C
goto Test_Mode ; if equal or greater, we're done recalling moves
incf Recall_Addr ; otherwise display next move
goto Recall_Loop

Reverse_Method
decfsz Recall_Addr ; output next move (note that 0x01 is the lowest move)
goto Recall_Loop

Test_Mode
btfsc flags, 1 ; if demo mode, skip user input...
goto Main ; ...and loop directly back to generate the next move
;------ This next section of the program recalls each move and waits for user input before comparing them.  After
;------ each move is recalled, we wait for user input by polling the switches.  Once one is pressed, the corresponding
;------ tone is sounded as long as the button is depressed.  Once released (if within the timeout period), the
;------ user input move is compared with the expected (recalled) move.  If they match, the next move is recalled
;------ until all moves are finished.  Then we loop back again to generate the next move.  Once we hit 63 moves,
;------ we're done.
clrf Recall_Addr
incf Recall_Addr ; begin at 0x01 for move recall for normal operation mode
movf Move_Number, 0
btfsc flags, 2 ; if reverse mode, start at maximum move number
movwf Recall_Addr ; reset address register to top position
GetUserInput
call Recall_Number ; get current "move" to match with user input
movlw 0x40
movwf TMR_Div ; reset divisor and overflow registers
clrf TMR_Overflow ; holds total timeout counts for user input
call WaitForButton ; waits for user input, W register holds button pressed on return
movwf User_Number ; dump off which button was pressed
movlw 0x0C
movwf Delay_Count
clrw
call Delay ; debounce switch to 20ms

movlw User_Number ; treat as literal to load address pointer into FSR
movwf FSR ; load FSR with LED_Number address pointer
call Switch_LED ; indicate which LED the user pressed
;------ Wait for button to be released - user can't cheat by holding down the button due to timeout.
;------ We will use User_Number to determine which button to wait for, rather than check ALL buttons, since
;------ the user could press another button and, due to the bounce, effectively "release" a button, thus throwing
;------ off the timing.
movlw 0x40
movwf TMR_Div
clrf TMR_Overflow
bsf INTCON, RBIF ; use flag to begin generating tone

call WaitForRelease ; if timeout occurs, Failed_Input will be called from WaitForRelease
clrf PORTB ; turn off LEDs (and buzzer if still on)
clrf Tone ; reset the tone register to stop generating tone

movlw 0x0C
movwf Delay_Count
clrw
call Delay ; debounce switch to 20ms

movf LED_Number, 0 ; compare LED and User numbers
subwf User_Number, 0
btfss STATUS, Z
goto Failed_Input ; if current move and User inputs don't match, abort

btfsc flags, 2 ; if reverse mode is set, skip to proper display method
goto Reverse_Compare
movf Move_Number, 0
subwf Recall_Addr, 0
btfsc STATUS, C
goto Main ; if equal or greater, we're done recalling moves
incf Recall_Addr ; otherwise display next move
goto GetUserInput

Reverse_Compare
decfsz Recall_Addr ; output next move (note that 0x01 is the lowest move)
goto GetUserInput

goto Main ; continuous loop - find the next number in the cycle

;------------------------------------------- Win/Loss Endgame routines listed below --------------------------------
Failed_Input
;------ Turn on LED that was SUPPOSED to be entered and sound error tone.
clrf PORTB ; reset LEDs and buzzer in preparation for Error indication
movlw LED_Number ; treat as literal to load address pointer into FSR
movwf FSR ; load FSR with LED_Number address pointer
call Switch_LED ; will sound correct tone with LED in addition to the error_tone
movlw 0x40 ; long tone delay
movwf speed_value
clrf Tone
bsf Tone, 4 ; error tone to be sounded
call SoundTone
clrw
clrf Delay_Count
call Delay
clrw
clrf Delay_Count ; set for 256 loops
call Delay ; wait for 1 second before sounding completed move count
;------ Divide Move_Number by 10 to identify to the user the maximum move number achieved.  Store multiplier in Recall_Addr
;------ and remainder in Move_Number.  Sound out total count with 10s as long low tones and 1s as short high tones.
;------ Also, light up Red LED for 10s and Yellow LED for 1s.
;------ We're not doing anything fancy here - we're just using successive subtraction for the division since it
;------ would be such a small number.  Alternately, some real division bit-shifting code could be substituted.
clrf Recall_Addr
Div_By_10
movlw 0x0A ; successive subtraction by 10
subwf Move_Number, 0
btfss STATUS, C ; if carry=0, we overflowed, so begin sounding tones
goto Sound_Tens
incf Recall_Addr
movwf Move_Number ; move remainder into Move_Number register for next subtraction
goto Div_By_10
Sound_Tens
movf Recall_Addr, 1 ; move file to itself to test for zero
btfsc STATUS, Z
goto Sound_Ones ; if Recall_Addr = 0, skip to Ones
movlw 0x20 ; longer time duration for 10s
movwf speed_value
clrf Tone
bsf PORTB, 2 ; turn Red LED on
bsf Tone, 0 ; Red tone counts number of 10s
call SoundTone ; shuts off buzzer and LED
clrw
clrf Delay_Count ; set for 256 loops
call Delay ; wait for 0.5 seconds between tones
decfsz Recall_Addr
goto Sound_Tens
Sound_Ones
movf Move_Number, 1
btfsc STATUS, Z
sleep ; if no Ones, then end game
movlw 0x10 ; shorter tone duration for 1s
movwf speed_value
clrf Tone
bsf PORTB, 3 ; turn Yellow LED on
bsf Tone, 3 ; Blue tone counts number of 1s
call SoundTone ; shuts off buzzer and LED
clrw
clrf Delay_Count ; set for 256 loops
call Delay ; wait for 0.5 seconds between tones
decfsz Move_Number
goto Sound_Ones
sleep ; power-down to save battery after game over

Game_Finished
;------ Cycle speaker tones to indicate game won.
movlw 0x07
movwf speed_value ; preset quick cycle time for tones in this routine
movlw 0x05
movwf Delay_Count ; just re-use Delay_Count as a loop counter
clrf Tone
GF_Loop
bsf Tone, 0
call SoundTone
bsf Tone, 1
call SoundTone
bsf Tone, 2
call SoundTone
bsf Tone, 3
call SoundTone
decfsz Delay_Count ; 4 times through this routine
goto GF_Loop
sleep

;------------------------------------------- Subroutines listed below ----------------------------------------------
Store_Number
;------ Stores value of LED_Number into EEPROM address "Move_Number"
movf Move_Number, 0
movwf EEADR
movf LED_Number, 0
movwf EEDATA
bsf STATUS, RP0 ; select Bank1 for EECON access
bcf INTCON, GIE ; disable interrupts temporarily
bsf EECON1, WREN ; enable EEPROM write
movlw 0x55
movwf EECON2
movlw 0xAA
movwf EECON2
bsf EECON1, WR ; write values to EE
bsf INTCON, GIE ; reenable interrupts
bcf EECON1, WREN ; disable EEPROM write
Waitforflag
btfss EECON1, EEIF ; poll flag bit for write cycle completion
goto Waitforflag
bcf EECON1, EEIF ; reset flag - write cycle complete
bcf STATUS, RP0 ; leave Bank0 active by default
return

Recall_Number
;------ Recalls the value located at Recall_Addr from EEPROM into LED_Number
movf Recall_Addr, 0
movwf EEADR
bsf STATUS, RP0 ; select Bank1 for EECON access
bsf EECON1, RD ; enable read
bcf STATUS, RP0 ; select Bank0 for EEDATA access
movf EEDATA, 0
movwf LED_Number
return

Randomize
;Rnew = Rold * 221 + 53
;221 = 256 - 32 - 4 + 1
;256 can be eliminated
;so we need to calculate Rnew = Rold * (1 - 32 - 4) + 53 using
;truncating arithmetic
;or Rnew = Rold * (-32 - 3) + 53
clrc
rlf LED_Number, 1
swapf LED_Number, 0
andlw 0xE0
rrf LED_Number, 1
addwf LED_Number, 0
addwf LED_Number, 0
addwf LED_Number, 0
sublw 0x35
movwf LED_Number
movwf Hold_Number ; used for demo mode only

;Then divide by 64 to get a result from 0-3 (4 values):
;shift LED_Number right 6 times
rlf LED_Number, 1
clrf rnd_hold
rlf rnd_hold, 1
rlf LED_Number, 1
rlf rnd_hold, 1
movf rnd_hold, 0
movwf LED_Number
return

Switch_LED
;------ Find out which LED should be turned on, then do it and select appropriate tone
;------ Indirect addressing is used due to 2 different sources to switch (user or program)
;------ Leave LED on when finished - must clear PORTB after this routine to turn off LEDs
;------ (This is done so when button is pressed by user input, the LED remains on)
btfsc INDF, 1 ; test bit 1
goto GT_2 ; number is either 2 or 3
btfsc INDF, 0 ; test bit 0
goto Yellow
bsf PORTB, 2 ; must be zero (Red)
bsf Tone, 0 ; set flag to turn on Low tone
return
Yellow
bsf PORTB, 3 ; number is 1 (Yellow)
bsf Tone, 1
return
GT_2
btfsc INDF, 0
goto Blue
bsf PORTB, 4 ; must be 2 (Green)
bsf Tone, 2
return
Blue
bsf PORTB, 5 ; number is 3 (Blue)
bsf Tone, 3
return

WaitForButton
;------ Continually poll PORTA switches to determine which was pressed (grounded).  Rather than using
;------ PORTB pin interrupt on change, polling is just as quick and I don't have to worry about reading
;------ other PORTB pins causing trouble or disabling/enabling interrupts at the proper times, etc.
;------ If TMR_Overflow equals allowed delay time (Timeout register), then abort due to timeout.
btfss PORTA, 0 ; normally pulled-up
retlw 0x00 ; Red button depressed (RA0)
btfss PORTA, 1
retlw 0x01 ; Yellow (RA1)
btfss PORTA, 2
retlw 0x02 ; Green (RA2)
btfss PORTA, 3
retlw 0x03 ; Blue (RA3)
movf TMR_Overflow, 0
sublw Timeout
btfsc STATUS, Z
goto Failed_Input
goto WaitForButton

WaitForRelease
;------ Continually poll PORTA switches to determine if User_Number pin was released.
;------ If TMR_Overflow equals allowed delay time (Timeout register), then abort due to timeout.
btfsc User_Number, 1 ; test bit 1
goto Pin2_3 ; number is either 2 or 3
btfsc User_Number, 0 ; test bit 0
goto Pin1Loop
Pin0Loop
btfsc PORTA, 0 ; when pin is pulled up again, return
return
movf TMR_Overflow, 0
sublw Timeout
btfsc STATUS, Z
goto Failed_Input ; exceeded timeout allowance
goto Pin0Loop
Pin1Loop
btfsc PORTA, 1
return
movf TMR_Overflow, 0
sublw Timeout
btfsc STATUS, Z
goto Failed_Input
goto Pin1Loop
Pin2_3
btfsc User_Number, 0
goto Pin3Loop
Pin2Loop
btfsc PORTA, 2
return
movf TMR_Overflow, 0
sublw Timeout
btfsc STATUS, Z
goto Failed_Input
goto Pin2Loop
Pin3Loop
btfsc PORTA, 3
return
movf TMR_Overflow, 0
sublw Timeout
btfsc STATUS, Z
goto Failed_Input
goto Pin3Loop

SoundTone
;---Set flag to start interrupt moving which starts tone sounding, clear flag inside interrupt.
;---At every TMR0 overflow, we will check to see if tone is still sounding and also to see if we have
;---to change the wave bit from high to low.  The "Tone" register bits being set will determine if
;---the PORTB, 1 output continues, since the flag is cleared after the first time through.
movlw 0x40
movwf TMR_Div ; reset divisor and overflow registers
clrf TMR_Overflow
bsf INTCON, RBIF ; use flag to begin generating tone
SoundToneLoop
movf speed_value, 0
subwf TMR_Overflow, 0
btfss STATUS, Z
goto SoundToneLoop
clrf PORTB ; turn off LEDs (and buzzer if still on)
clrf Tone ; reset the tone register to stop generating tone
return

Delay
;------ Note that W register must be cleared before calling this routine to obtain the proper delay.
;------ Delay_Count is predefined with the multiplier (Delay_Count*256 loops*4Tcy) gives total delay.
;------ Delay is approximately .45 seconds with Delay_Count=0xFF.
;------ Note that if W register is preloaded with higher values, the total delay time can be fine tuned.
;------ Alternately, another constant can be defined and preloaded prior to entering this routine, then
;------ copying it to W and proceding normally.  Another inner loop would need to be defined, with the
;------ constant value being held outside the inner loop.
addlw 0x01
btfss STATUS, Z
goto Delay
decfsz Delay_Count
goto Delay
return

END                     ; directive 'end of program'
Fuente codigo: http://www.piclist.com/techref/piclist/simon/simon.asm
Fuente:http://www.piclist.com/techref/piclist/simon/index.htm
Otro diagrama:
![picSimon-schematic489x456[1]](http://www.pesadillo.com/pesadillo/wp-content/uploads/2009/07/picSimon-schematic489x4561.png "picSimon-schematic489x456[1]")
Fuente: http://people.usm.maine.edu/houser/picsimon/index.html
Otra WEB recomendada de experimentos: www.bricogeek.com
|
|


 | 27 julio 2010 en Electronica | tags: Electronica |


tengo el juego don simon original pero le falta la bateria de 9v, donde puedo conseguirla? la empresa ya cerró y en las ferreterias me dicen k no tienen…